Immunofluorescence (IF) microscopy enables cellular detection, localization and distribution pattern of antigens with fluorescent-conjugated antibodies. When all experimental settings are optimally defined, IF can bring valuable information such as dynamics of protein trafficking, protein co-localisation…
In the vast majority of IF procedures, cells are fixed and then permeabilized for antigen detection through successive incubations. Anyhow, a few settings are necessary to achieve remarkable stainings.
Here, you’ll find 5 tips to help you to define optimal IF settings and get publication-grade images (or even a Nobel Prize in chemistry?).
Tip # 1 – Cell sample preparation
Cell fixation and permeabilization are crucial and cell-dependant steps. They might allow the antibodies used to reach their targets without altering cell and antigen integrity. These conditions can very often be obtained by fixing cells with 2% – 4% paraformaldehyde and permeabilizing them with either 0.1% saponin (mild treatment) or 0.2% Triton X-100 (this latter is recommended for nuclear antigen detection).
Another point to keep in mind, is that saponin, on the contrary to Triton, induces reversible permeabilization. Thus, Saponin might be included during the initial permeabilization but also during antibody incubation.
The third possible alternative (with no detergent) is to simultaneously fixe and permeabilize cells with ice-cold methanol.
The number of treated cells might result in about 50% of cell confluence at the time of staining. If the cellular density is high, the cell architecture might not be well analysed and the background will be too high. A low cellular density will reduce the chance to find a field with the optimal target pattern.
Non-adherent or weakly attached cells can be “trapped” by coating the coverslips with poly-lysine or extracellular matrices (collagen or laminin) to grow on glass surfaces.
Tip # 2 – Target specific antibodies and internal controls
Even if obvious, it is nevertheless useful to remember that the antibodies used must have a high specificity for the antigen (target) of interest. This condition is related to background reduction and is a stronger guarantee to obtain reliable protein localization patterns.
It’s also strongly recommended (and even ideal) is to add appropriate controls to check the specificity of the antigen being recognized. For this, you might:
- use slides stained with secondary antibody only (to determine the threshold of background signal)
- include cells lacking the antigen of interest.
The addition of an isotype control or pre-immune serum (when working with anti-serum) can also be suitable as an internal control.
Usually, 1 µg/mL of purified antibody or 1/100 to 1/1000 of anti-serum achieve specific stainings. For the first experiment with a new antibody or to characterize an antigen, you might titer your immuno-reagents through a series of dilutions. It is strongly recommended (some might say mandatory) to use pre-adsorbed secondary antibodies when running multiple IF stainings. For this, choose your secondary antibodies from the same species of the primary antibodies you’ve selected.
These internal controls will make data interpretation easier (don’t forget to include your secondary antibody only as well as isotype controls and other negative controls where the antigen is not present). You’ll be able to differentiate artifacts from auto-fluorescence and improper permeabilization that are at the origin of poor staining and misleading patterns.
Tip # 3 – Buffers and blocking agents
Conventional buffers like PBS are used routinely. Nevertheless, significant improvements can be achieved with buffers that include calcium, magnesium and potassium. As for blocking agents, a final concentration of 5 to 10 % FBS is a good start for your first IF tests. BSA fraction V, Gelatin or serum from the same species as the secondary antibody can also be used.
Background reduction can also be reached by:
- adding a blocking step with serum (from the same species of the secondary antibody) instead of BSA in your protocol
- reducing the amount of antibody (especially the secondary)
- shortening incubation times as well as having at least three 5-minute washes (PBS + 0.05% Tween, recommended) between incubation steps.
Tip # 4 – Mounting step
The final step involves mounting solutions.
The purpose is to improve the refractive index and help to preserve the sample. Nevertheless, applying the right amount of mounting media can be tricky. If you apply too much of the solution, you can overflow and blemish the edge of the coverslip. Using too little mounting solution can result in air bubbles trapped between the coverslip and the slide. To reach a “balance”, the optimal amount of mounting media should take about 30s to spread out when the coverslip is placed on the slide.
Tip # 5 – Multiple stainings
When your experimental settings are optimal for a single antigen staining, you might like to consider analysing the expression and co-localization of two different antigens in the same sample.
For this, the 2 antibodies detecting their respective antigen can be incubated simultaneously. In that case, make sure that each of the primary antibodies is generated from a different species. The fluorescent-labelled secondary antibodies used will then be detected through separate channels. For example, the fluorophores can range from small molecules to bigger ones (DyLights, ATTO, or PE).
Sequential double staining can also been envisaged. In which case, all blocking, primary and secondary incubations are completed first for the first antigen and then performed for the the second antigen. In general, the sequential approach seems to generate better images and fewer artifacts.
Want to explore more?
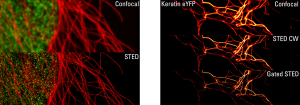
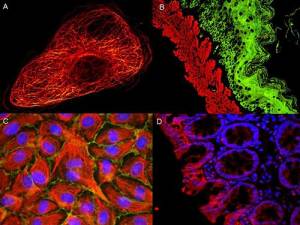
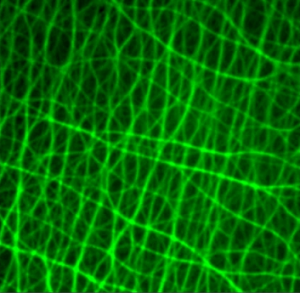
The number of applications compatible with fluorescent microscopy has recently explosed with the emergence of new ultra-resolutive technologies and the release of fluorescent-labelled biomarkers to study cytoskeleton dynamics.
This is the case with ATTO-actins (390, 488, 550 and 647 nm) which probe actin polymerization and transfection-free actin and tubulin fluorescent dyes for live-cell imaging (SiR actin and SiR tubulin).
What about your tips in fluorescent microscopy? Share them by leaving a comment below!