
Cryopreserved hepatocytes contain the major hepatic drug-metabolizing enzymes required to study the four categories of xenobiotic biotransformation: hydrolysis, reduction, oxidation and conjugation. Cryopreserved hepatocytes are ready when you are. A simply quick-thaw protocol is performed to remove cryoprotectant and have viable cells… However, the functionality and the viability of these cells can be impaired by an incorrect thawing procedure…
Cryoinjury
Before starting to thaw hepatocytes, like any other cryopreserved primary cells, it is important to keep in mind cryoinjury phenomena. Cryoinjury has an osmotic effect on the cells as well as causing intra- and extra-cellular ice formation, which can have effects such as altering the native conformation of proteins. Cells sustain cryoinjury each time they cross an intermediate temperature zone from -15 to -60°C, first during the cryopreservation process and again at thawing.
The major effects of cryoinjury on hepatocytes are cellular membrane disruption, single and double DNA breaks, reduced cell attachment in culture, reduction in phase I and II activities, etc
 A first tip to reduce the effects of cryoinjury is to rapidly transfer hepatocytes from liquid nitrogen to a 37°C water bath. Rapidly means that you should avoid as much as possible to transfer the vial of hepatocytes from the liquid nitrogen storage to the cell culture lab into dry ice, or at room temperature… This is basic advice, but it has a dramatic effect on cell viability.
Thaw time is critical
 Tip number two… Keep in mind that thaw time is critical! Over-thawing cryopreserved hepatocytes will result in low yield and viability. 60 to 80 sec is generally enough… For best results ensure level of water in the water bath is above the highest frozen point in the vial.
To reduce the toxic effect of the cryoprotectant, generally DMSO, on your cells, you also have to go as quickly as possible through the washing and centrifugation steps. Never vortex or vigorously re-suspend the hepatocytes. A gentle rocking motion is recommended.
Debris removal
A single washing step is most often enough to ensure clean hepatocyte preparation. I generally set the centrifuge at 100g. Most of the time this is enough, never go above 120g. Of course, your centrifuge has to be calibrated regularly. If you have to run a second centrifugation (for example if you over dilute your cells before enumeration) it should be at a lower speed, 60g if you ran the first one at 100.
 I do recommend to never pour off supernatant after centrifugation, due to the high risk of losing the viable cell pellet during the pouring process. The best practice is to aspire the supernatant. When aspiring, keep the tip of the aspirator at the highest level of media to ensure any cell debris is removed before reaching the viable cell pellet.
Dilute the hepatocyte suspension to the desired concentration. I recommend performing two Trypan blue counts for verification of yield and viability.
Plating hepatocytes
Hepatocytes have to be plated on Collagen I surfaces to ensure the best adhesion and confluence. Seeding density is probably the most important parameter to take into account when plating hepatocytes. Please refer to your vendor’s datasheet to seed cells at the right density. For example, Xenotech systematically plate each lot of hepatocytes at 5 densities prior to recommending the best one.
The table below provides recommended seeding volumes for the various plating formats.
| Well Format | Recommended Seeding Volume Per Well |
|---|---|
| 6-well | 1.7 mL |
| 12-well | 650 µL |
| 24-well | 330 µL |
| 48-well | 200 µL |
| 96-well* | 100 µL |
*The 96-well plate format should be seeded at approximately 0.4 – 0.6 times the seeding density recommended on the data sheet (0.25 x 10⁶ – 1.0 x 10⁶ viable cells/mL). Additionally, don’t swirl 96-well plates to distribute cells.
Place the seeded culture vessel in the in a 37°C humidified CO2 static incubator and swirl in a figure 8 pattern to evenly distribute the cell suspension (cell distribution can be adequately viewed with the naked eye).
Allow cells to attach for 2-6 hours in the incubator. Check attachment every hour until sufficient confluency is achieved (the hepatocytes will flatten out over time to fill in the majority of the gaps). After the attachment period, swirl the culture vessel (to suspend the unattached cells) and aspirate media containing non-attached cells. Add your hepatocytes culture media to each well or plate and return the dishes to the incubator. Every 24 hours, the media should be aspirated and replaced with hepatocyte culture media (warmed to 37°C). Dosing with compound can begin after the hepatocytes have been in culture for 24-48 hours.

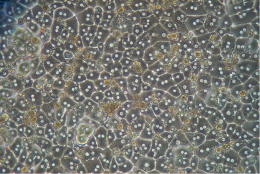
The picture above represents a correct hepatocytes monolayer after plating. You can see a fully confluent monolayer, cuboidal hepatocytes with good cell-cell contact and one to two centrally located nuclei.
Conclusion
Thawing primary cells generally requires simple procedures. However, some errors may affect viability and functionality of your cells. Put the odds on your side and follow the right steps! We do also provide, at tebu-bio, the technical support and assist you towards being confident in these procedures. Please don’t hesitate to contact us if you’d like to follow training in our lab… or to invite us to provide training in your lab!


